How Git Works: A Beginner's Friendly Guide

You can often see the Git requirement in jobs for an experienced QA, so the time will come when you need to learn it.
This guide will help you understand what Git and version control are, basic Git commands, and how you can use them to work with your code.
This tutorial is beginner friendly as the examples will be very clear for everyone :)
What is Git?
Git is a version control system that lets you track changes you make to your files over time.
A version control system is a system that allows a group of people to collaborate on code without the risk of accidentally overwriting someone else’s work. It also allows the team to keep track of who changed the code and when it happened, so you can easily get to the root of the problem.
Think of it as an entire timeline of your project from the beginning to the end. With Git, you can revert any state of your files. You can also make a copy of your file, make changes to that copy, and then merge it with the original file.
1. How to install Git
To use Git, you need to install it on your computer. You can download the latest version from the official website.
2. How to configure Git
So, you have installed Git on your computer. Let’s check it out: open a terminal and type git --version or git -v. This shows you the current version installed on your PC.
Next, you need to set a username and email. Git will use this information to determine who made changes to the files.
Run the commands:
git config --global user.name "YOUR_USERNAME"
git config --global user.email "YOUR_EMAIL".
Replace "YOUR_USERNAME" and "YOUR_EMAIL" with yours.
How to create and initialize a project using Git
Now let’s create a project.
- On your PC, create a folder with any name, for example “Git learning”.
- In a terminal, run the command
cd desktop, and thencd Git learning
As a code editor I use Visual Studio Code with its own terminal for executing commands. If you want to use it, download it here.
After installing VS Code, open the “Git learning” project in the editor and open a new terminal.
Now, to initialize your project, run the command git init . This command will tell Git to be ready to start tracking your files.
Create a file inside a folder “Git learning” with any information, for example shopping list.txt. The file might look like this:
Shopping list:
1. Cookies;
2. Candy;
3. Marshmallow;
4. Chocolate.
What is GitHub?
Before we continue, let’s know what GitHub is.
GitHub is an online hosting service for Git repositories.
Imagine that you are at home and working on a project. You went to visit someone and suddenly remember that you did not finish your work. But your computer is not with you, and you do not have access to it. But at the same time, your project is on GitHub and your friend has a computer. With the help of GitHub, you can download this project using the command on any computer. You can then make your changes and push the latest version back to GitHub.
So GitHub allows you to store your repo on their platform.
How to push a repository to GitHub
Step 1: Create a GitHub account
Create a personal GitHub account here.
Step 2 - Create a repository
Click the “+” symbol in the top right corner of the page, select “New Repository”. Give your repository a name, then scroll down and click “Create Repository”.
Step 3 - Add and commit files
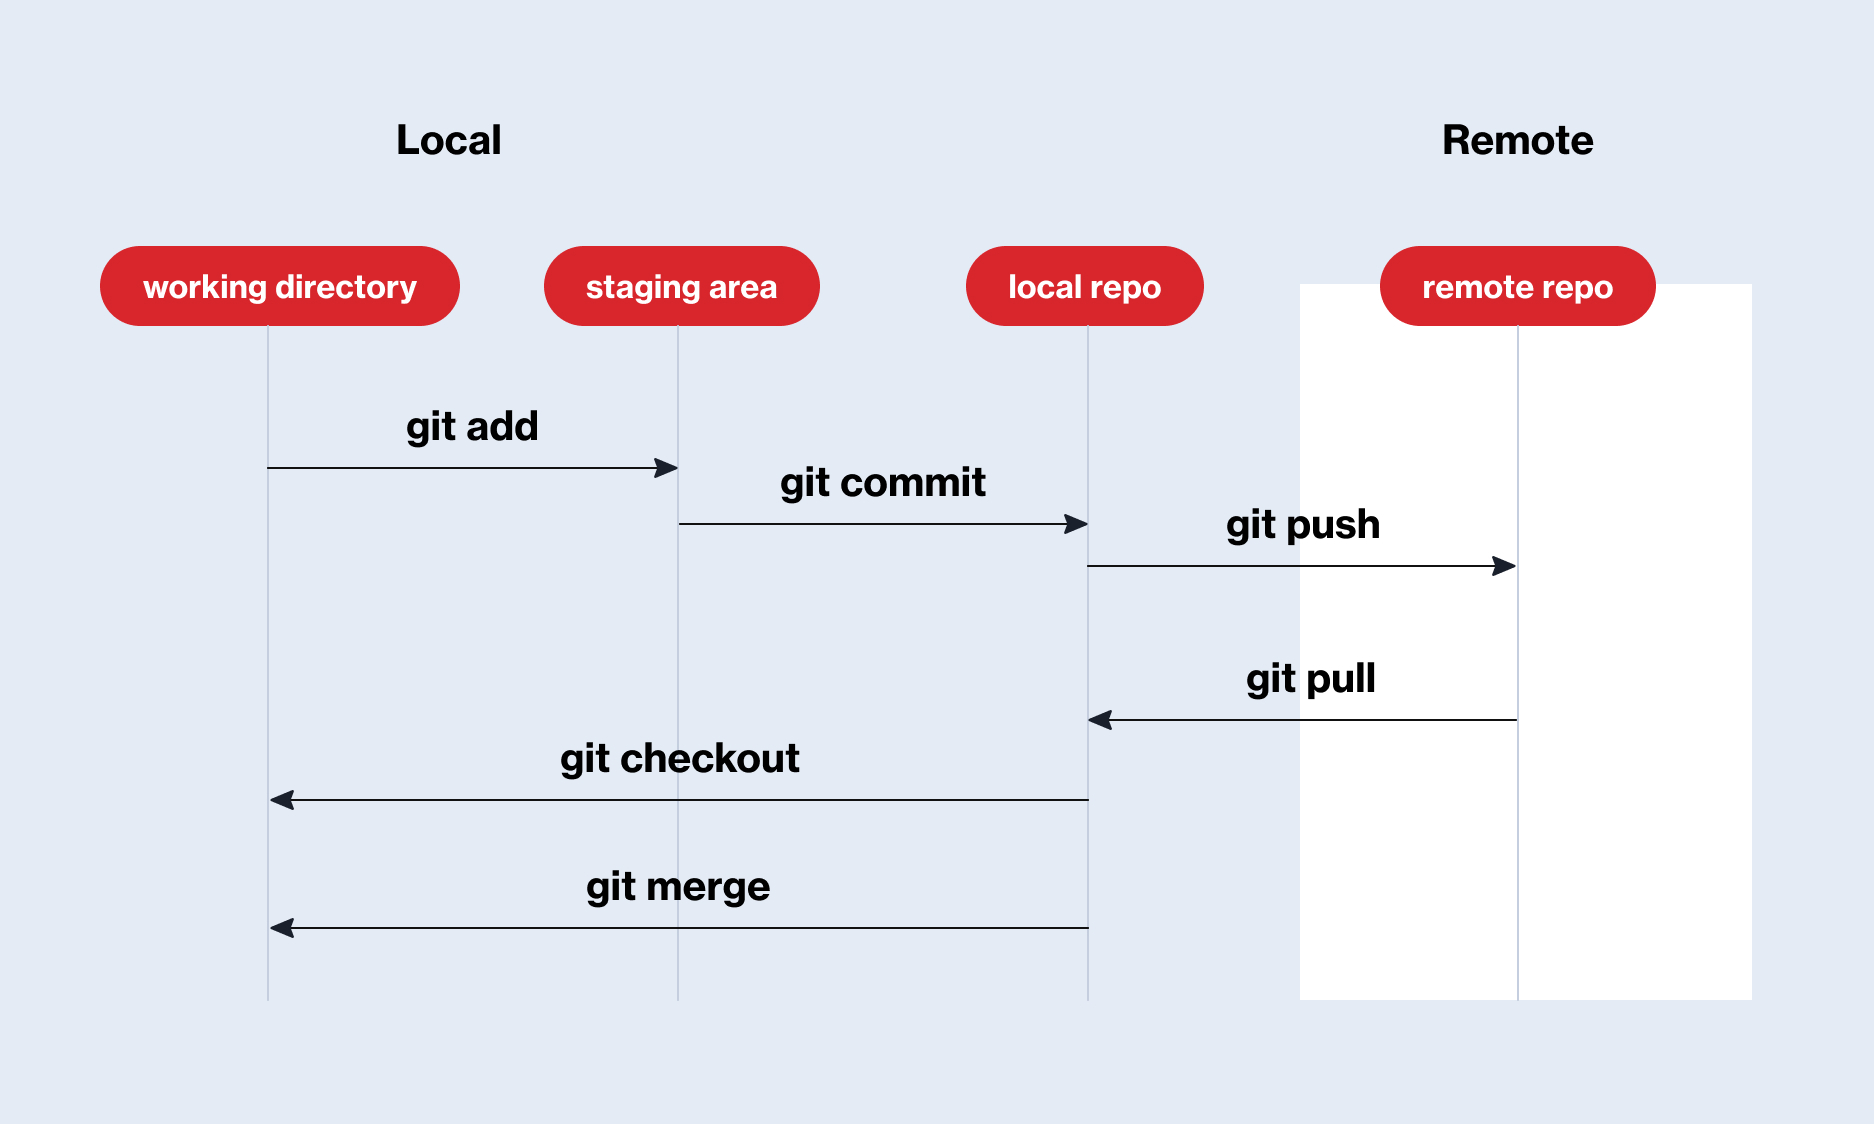
Before we “add” and “commit” our files, you need to understand at what stages a file is tracked by Git.
There are 3 states:
Modified state
A file in modified state contains changes but has not yet been saved. This means that the state of the file has been changed from its previous state.
Staging state
A file in the staged state means that it is ready to be committed. In this state, all necessary changes have been made, so the next step is to move the file into a committed state.
Committed state
The file is in the committed status if all changes have been saved to the local repository. Files in the commit stage are files that are ready to be pushed to a remote repo (on GitHub).
How to add files to Git
We’ve initialized the project, but Git isn’t tracking the file yet. So we are in the modified state now.
So, you have created the file shopping list.txt. Do some changes in this file, for example, I added a new item to the list:
Shopping list:
1. Cookies;
2. Candy;
3. Marshmallow;
4. Chocolate;
5. Apples.
Now we are still in a modified state.
Run the command git add -A.
The file is now in the staging state. You won’t get a response from this command, but to see what state your file is in, you can run the git status command.
How to commit files in Git
To commit our file, run git commit -m "initial commit". Now our file is in a committed state.
git commit tells Git that all files are ready to be committed, so it’s time to commit the changes. The second part -m "initial commit" is the commit message. -m is short for message, and the text inside the is the commit message. Usually, the message briefly states what exactly was done.
Don’t forget to leave commit messages so that the commit history will be clear in the future.
Step 4: Push the repository to GitHub
After you have created the repository, you are redirected to a page that tells you how to create a local repository or push an existing one.
Since our project already exists, we need to push it. Copy all the commands from the “…or push an existing repository from the command line” section. These are the commands:
git remote add origin "your URL"
git branch -M main
git push -u origin main
The first command git remote add origin creates a connection between your local repository and the remote one on GitHub.
The second command git branch -M main changes the name of your main branch to “main”.
The last command git push -u origin main pushes the repository from your local device to GitHub.
How to use branches in Git
With branches, you can create a copy of the file you want to work on without changing the original one.
Let’s imagine that we want to add a new item to the shopping list, but we are not sure exactly about it. In this case, we can create a new branch called “test” to see what the new list will look like.
Run the command: git checkout -b test.
checkout tells Git that it is supposed to switch to another branch. -b tells Git to create a new branch. test is the name of the branch to be created to switch to.
We have created a new branch “test” from the state of our last commit. Now let’s add a new item to the shopping list:
Shopping list:
1. Cookies;
2. Candy;
3. Marshmallow;
4. Chocolate;
5. Apples.
6. Car.
To merge a new state into the master branch, you must first commit and commit that branch.
You should try it yourself to understand how it works, as we did it twice in the previous section. Add the file to git tracking and then commit with a message.
After committing the “test” branch, switch back to the main branch by issuing this command: git checkout main.
Now merge the changes into the master branch by running git merge test. At this point, you will see that all changes made on the test branch are reflected in the master branch.
If you push your repo to GitHub, you will see that the “test” branch has not been pushed. It will only remain in your local repository. If you want to push that branch too, switch to the branch with git checkout test and then run git push -u origin test.
How to Pull a Repository in Git
To pull means to clone a remote repository to your computer. To test this run cd .. to leave the current directory. Go to GitHub, and on your repository’s main page you should see a green button that says “Code”. You can see two options - HTTPS and SSH.
How to Pull a Repository in Git using HTTPS
Copy the HTTPS URL.
After that, run git clone COPIED_HTTPS_URL. This command pulls the remote repository into your local computer.
By default, Git connects to remotes using the HTTPS protocol which requires you to enter your username and password every time you run a command such as git pull or git push.
How to Pull a Repository in Git using SSH
Using the SSH protocol, you can connect and authenticate to remote servers and services. With SSH keys, you can connect to GitHub without supplying your username or password with each visit.
First, check whether you have any existing SSH keys. To do this, open the terminal and enter ls -al ~/.ssh
If you don’t have an existing public and private key pair, then generate a new SSH key.
- Open the terminal
- Run the command:
ssh-keygen -t rsa -b 4096 -C "your_email@example.com" - Press Enter when prompted to “Enter a file in which to save the key” to accept the default file location
- Enter a secure passphrase when prompted
- Copy the SSH key to your clipboard:
pbcopy < ~/.ssh/id_rsa.pub - Open Settings on your GitHub page
- Select SSH and GPG keys in the menu on the left-hand side
- Click the New SSH key button
- Paste your SSH key
- Click the Add SSH key button
Conclusion
So whether you are already a QA or a fresh graduate considering testing as a career, I hope this guide helps you understand what GIT is and how to use it.
I also want to share with you a great site Learn GIT branching where you can practice Git.
And here GIT command explorer you can easily find the right command.
Short Git proficiency Roadmap for QA:
- Learn the definitions of Git and VCS
- Download Git from the official site
- Understand the basics of Git
- Learn how to work with GitHub
- Complete all practice sessions
- Download the Pro Git Book
- Learn Pro Git Book Practice on real projects
Not everything will work out the first time, but don’t forget why you started!
If you find this article interesting and useful, then don’t forget to share this with your friends. Also, feel free to share your comments/suggestions below ❤️